


When it comes to heavy lifting, the crane you choose and how you set it up can make all the difference.
It’s something we see across a wide range of projects, not just one type of job. Whether it’s working on infrastructure, industrial installs or complex city centre lifts, the setup is what makes the lift possible in the first place.
Every crane works differently. Things like reach, counterweight, outrigger setup and jib length all affect what it can safely lift and where it can work. It’s not just about lifting capacity on paper — it’s about how that crane performs in the space available on site.
That’s where the planning comes in.
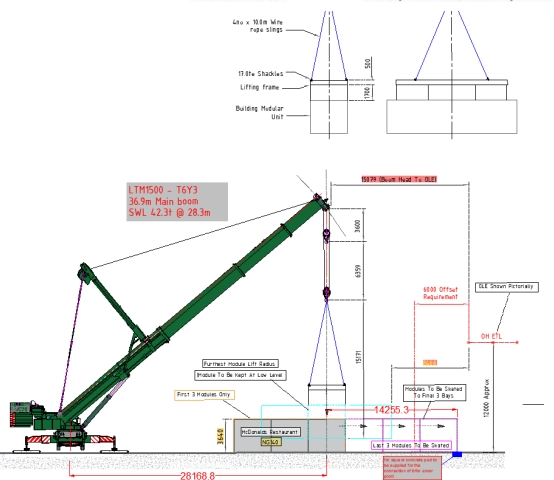
Before anything arrives, we use tools like AutoCAD to map out the lift. This helps us choose the right configuration, making sure there’s enough reach, the correct ground setup, and no clashes with surrounding structures.
You can see how important this is across a number of projects:
- On the tunnel boring machine lift in London, working 35 metres below ground meant crane setup had to be carefully planned around a confined shaft and limited working space.
- The airbridge lift at Southampton Docks involved multiple technical lifts using two cranes, where positioning and coordination were key to making everything work safely.
- On the Midland Metro Alliance project, lifts were carried out under time pressure in restricted urban environments, where the wrong setup would quickly cause delays.
- The abnormal load project for TGE Gas Engineering required a multi-stage approach, using several cranes working together to move and position large components from port to final location.
- Even on projects like the Commonwealth Games aerial wire installation, crane configuration had to work within a built-up environment with tight access and strict controls.
A good example of detailed setup closer to home is the Jost JTL 168.8 dismantle at Trafalgar Way. With only 94 metres of available space and an 80.5 metre luffing jib, there wasn’t much room to work with. The configuration had to be right, supported by careful planning, bespoke outrigger mats and a hybrid approach to building and dismantling the crane.
Across all of these jobs, the same principle applies. The lift itself is only part of it — the setup determines whether it can be done safely and efficiently.
On site, once the crane is built and ready, there’s no room for guesswork. The hard work has already been done in the planning stage, so the team can focus on carrying out the lift properly.
When everything is configured correctly, the job tends to run as it should. When it isn’t, that’s when issues start to appear.
It’s not the most visible part of the job, but it’s one of the most important. Getting the setup right is what makes everything else possible.